
Quick & Easy Stocking Tutorial

Quick & Easy Quilted Stocking Tutorial
Hi Everyone! Tis the season for Holiday Cheer so we thought we’d provide you a quick and easy quilting stocking tutorial with a free stocking template you can download.
This is a great way to work with your Holiday scrap fabrics and scrap batting.
These stockings will finish at a size of 10” by 16” (toe to heel for width) using the templates at 100% original size, but you can enlarge or reduce to personal preference when you print the templates out. We will include instructions for both methods.
Supplies Required for each Stocking:
- 1 Fat Quarter – Lining
- ½ Fat Quarter – 11” x 18” Backing
- Assorted strips or scraps for patchwork to a size of 11” x 18”
- Scrap Batting 9” x 18”
- Stocking Template #1 and Stocking Template #2
Print out the two templates and tape them together (“Combined Stocking Template”). You may want to use a manila folder or card stock so it’s a little sturdier if you are making more than one stocking.
All seams are assumed to be ¼” seam allowance unless otherwise noted.
Stocking Assembly
- Using your Combined Stocking Template and your Lining Fat quarter, trace two lining pieces. The lining will create a contrasting trim if you so choose, so select a lining fabric that you will want to show at the top of the stocking in case you go that route. You need to have the template toes facing in opposite directions. Amanda placed the second stocking upside down on the same fat quarter.


Stocking Lining – cut out (2) Completed Stocking Templates facing opposite directions!

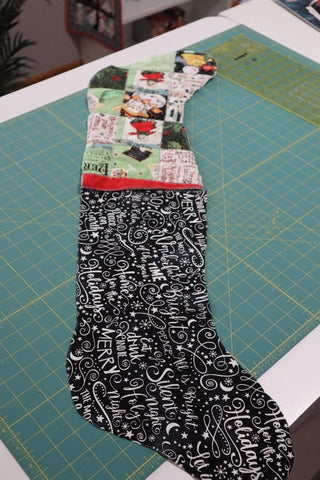
2. Now you have a decision to make You can (1) use a single fabric and just use that single piece as the entire stocking front, (2) piece some Christmas scraps together to then quilt to batting [Amanda pieced 15 4.5” squares of scraps an added a strip of red at the top for a border] or cut 15-18 strips of Christmas scraps at least 8”-9” long and various widths and apply a Quilt As You Go (QAYG) method.

Next, trim a piece of scrap batting slightly larger than the Combined Stocking Template.
 IF you are using option (3) and using strips of fabric in a QAYG method, determine the order of your strips before you start sewing. Create two stacks of strips working from the middle of the stocking out to the top and bottom, to keep the strips in order.
Place the middle strip in place face-up on the bating at the desired angle and lay the second strip that will go UP the stocking, face-down on that strip. Sew strips together using a ¼” seam allowance.

Open up the strip and press it flat. Continue to add strips using the same method, going up the stocking and going DOWN towards the toe of the stocking. Using a walking foot for this portion of the project will help keep the layers uniform and help to prevent puckering of the batting.

When all the strips are sewn onto the batting, lay the Combined Stocking Template on the batting side of the stocking and trim to size. Then, quilt as desired. Straight line quilting will give you a classic look and texture.


After your piecing is completed – whether you are (1) using a single fabric that you quilt to the batting, (2) piece your stocking “top” that you then cut out and quilt accordingly or (3) QAYG method with strips of fabric, it is time to assemble the stocking!
- Trim the stocking front using the Completed Stocking Template on top if you have not already done so, and trim to size.
- Trim off 1” at the top.
- Cut a backing piece (Amanda just used muslin) FACING THE OPPOSITE DIRECTION and also trim off 1” at the top. This will allow for the trim to show at the top of the stocking; if you prefer not to have the trim, you can leave the front and back pieces the same height as the lining.

You should now have a stocking front, a back and two lining pieces.
Match up the quilted front of the stocking with a lining piece, right sides together (toes pointing in the same direction) and then match up a backing piece with a lining piece, right sides together, toes pointing in the same direction. Sew just the top edges together and press seams open.
One unit at a time (front unit with lining and back unit with lining), with right sides together, sew all the way around the edges leaving a 4” turning point in the lining just as you would a simple placemat. This just ensures that the lining will be nicely secured before you attach the front and back units together.
Before you turn each unit right-side out, trim the fabric close to the seam allowance to remove bulk. Clip the curved portions of the unit as needed to ensure it turns nicely. Press with a hot iron and close the 4” turn gap with a top stitch.
OPTIONAL – Tuck the stocking lining inside the stocking, leaving the top of the lining sticking up ¼” to create a contrasting trim. Carefully shape and press the stocking. Top stitch around the top edge of tat trim 1/8” from the top. (Amanda accomplished a similar effect by sewing the red strip at the top of her pieced stocking top and trimming accordingly).
Place the front and back stocking pieces together, with the backing side facing the front stocking side, and sew all the way around keeping the stocking top open, starting and ending with a back stitch. Turn the stocking right side out and press if needed for a nice smooth stocking front.


Create your hanging tab
To create a hanging loop, cut a scrap piece of fabric 1.5” x 6” long. Place face-down on your mat, fold in half and crease, and then open fold each side to that crease line and press with a dry hot iron. Fold in half again so the loop is ~ ¼” wide and top stitch both sides closed using a matching thread color.


Fold the loop in half and pin to the inside of the back seam of the stocking. Sew it in place. Voila! Stocking complete!
